Jenkins Pipeline Step: Node Security Project
How to run continuous vulnerability scanning using the node security project in your CI/CD pipelines.

At HP, we make heavy use of Node.JS, and Jenkins for our build pipelines. We are also a security business, so any steps we can take to secure our code we take.
Subsequently I wanted to add a build pipeline step which automatically validated our packages, and their child dependencies against the Node Security Project which is a public list of known vulnerabilities in Node.JS modules. If a vulnerability was found obviously, I wanted to break the build.
Prerequisites
This can all be achieved relatively easily in Jenkins by making use of the Compiler Warnings plugin, so make sure you have this installed in Jenkins before we start.
You will also need to have the NSP module installed on your build server, easily done with npm install -g nsp.
Setting up the plugin
First things first, we need to configure the compiler warnings plugin. Basically all this plugin does is scan your build log and attempts to match on a given RegEx. To configure the plugin head over to your Jenkins Configuration page and scroll down to the Compiler Warnings section.
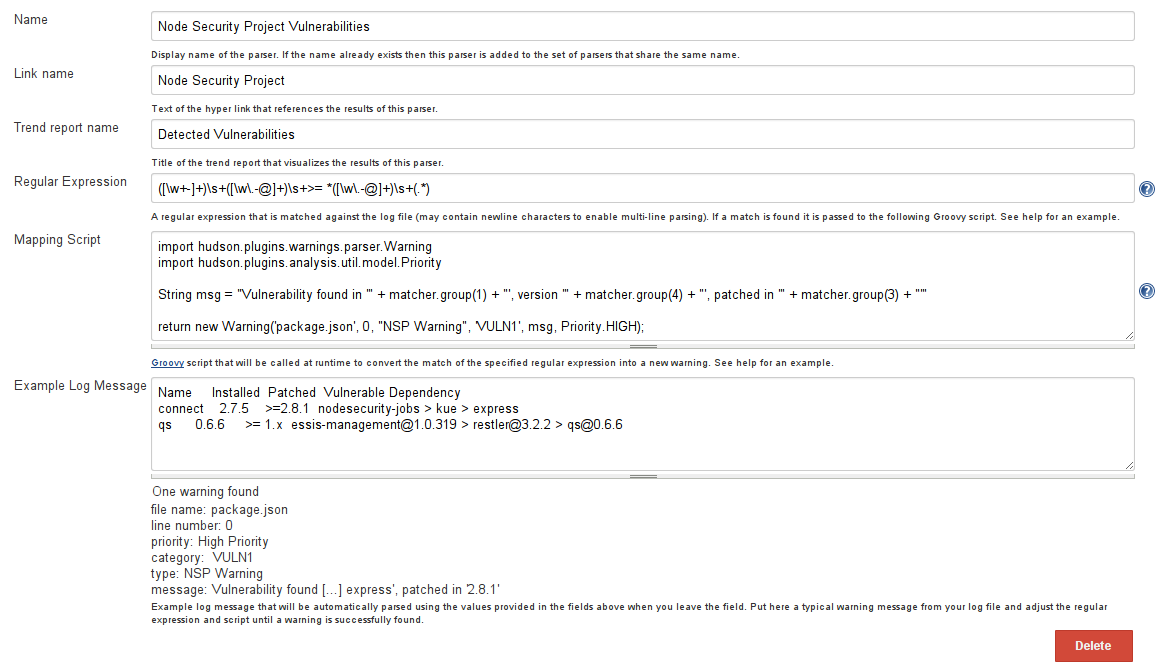
You want to create a new type of warning here with the following information:
- Name: Node Security Project Vulnerabilities
- Link Name: Node Security Project
- Trend Report Name: Detected Vulnerabilities
- Regular Expression:
([\w+-]+)\s+([\w\.-@]+)\s+>= *([\w\.-@]+)\s+(.*)
The mapping script is the part that takes the result from your RegEx and creates a hudson.plugins.warnings.parser.Warning object which Jenkins can recognise. Set it like this:
import hudson.plugins.warnings.parser.Warning
import hudson.plugins.analysis.util.model.Priority

String msg = "Vulnerability found in '" + matcher.group(1) + "', version '" + matcher.group(4) + "', patched in '" + matcher.group(3) + "'"

return new Warning('package.json', 0, "NSP Warning", 'VULN1', msg, Priority.HIGH);
Example Log Message, to save you some time, here is an example output from the module:
Name     Installed  Patched  Vulnerable Dependency
connect    2.7.5    >=2.8.1  nodesecurity-jobs > kue > express
qs         0.6.6    >= 1.x   [email protected] > [email protected] > [email protected]
With all those bits in, your page should look like this:
Adding a Build Step
You will need to add a build step now that executes the nsp package we installed earlier. This is quite simple, go into jenkins and add a new Shell build step, and in it just add nsp audit-package. It's important to not this must be after an npm install, so that all the child dependencies are checked too.
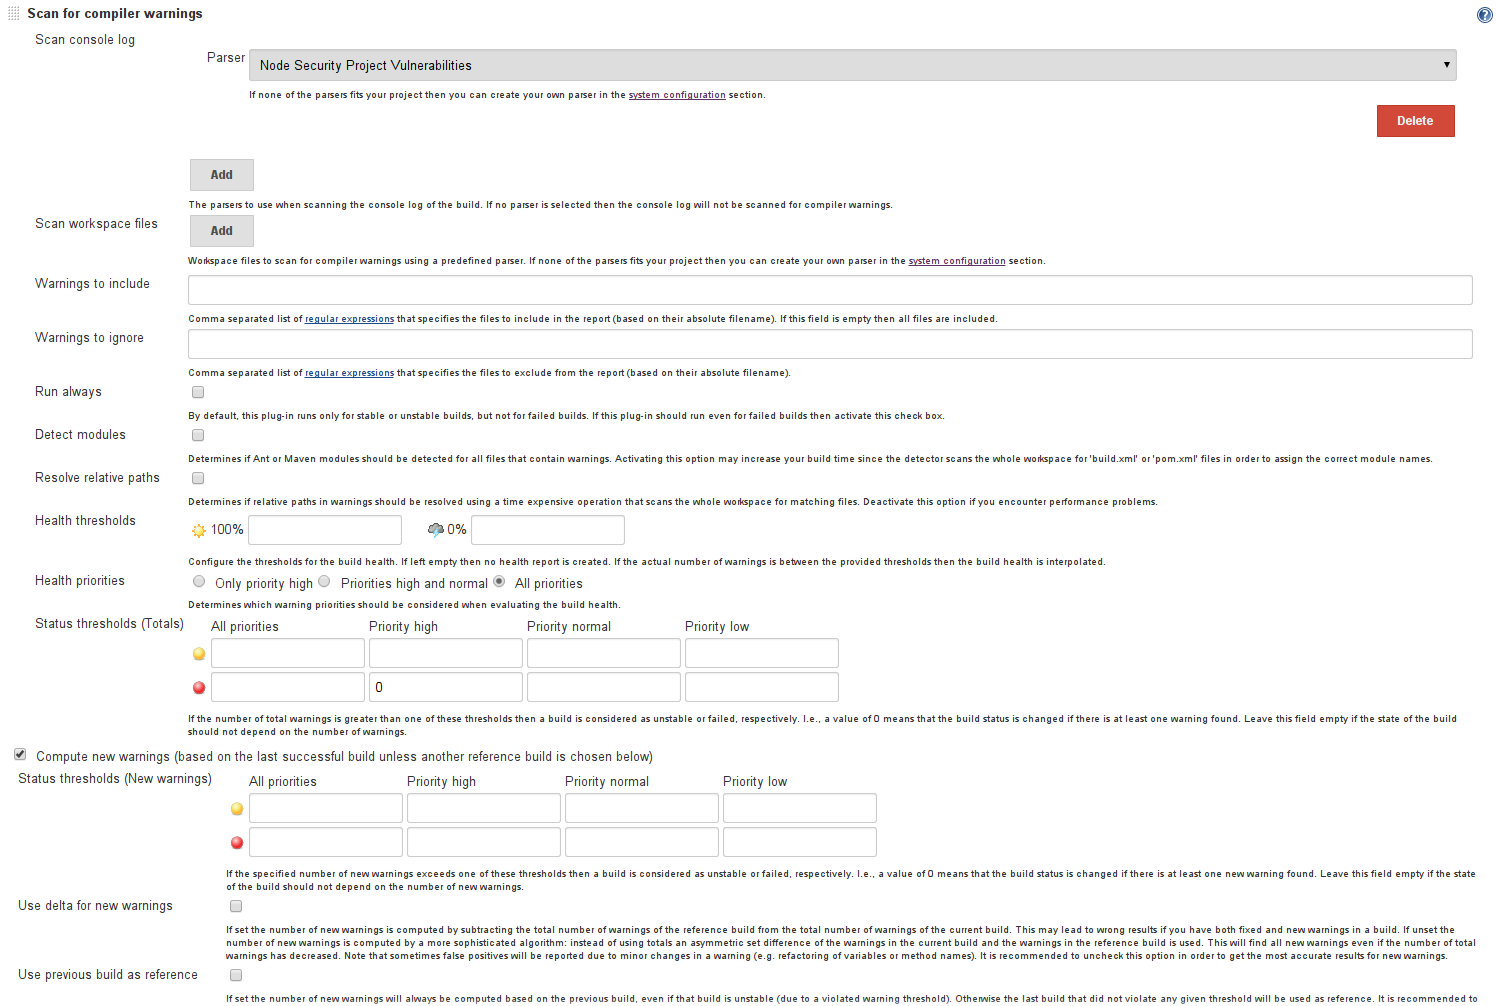
Post-Build Action
The next step is to add a post build action to the project, the screenshot below shows a configuration that will break the build if any vulnerabilities are detected.
The important settings here are:
- Parser: Node Security Project Vulnerabilities
- The
0in the Priority High status threshold box - And the tick box in Compute New Warnings
That's it
At this point if you run your job (and there are any detected vulnerabilities) you will see this in your build log:
10:14:22  => nsp audit-package
10:14:33 Name  Installed  Patched  Vulnerable Dependency
10:14:33 qs      0.6.6     >= 1.x  [email protected] > [email protected] > [email protected]
And your build will go red.
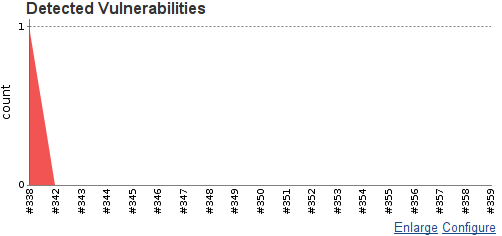
You will also get a nice little graph of your vulnerabilities over time:
And also, on the build page, you can view the report:

I hope this article was of use, any questions just ask.